Quick Start Guide
Get started with ReconcileIQ in minutes. Follow these essential steps to perform your first automated bank reconciliation.
1. Prepare Files
Export bank & book data (CSV/XLSX/XLS).
2. Upload Files
Drag & drop or select your files.
3. Map Columns
Confirm Date, Amount, Description.
4. Review Results
Identify & action discrepancies.
5. Export & Action
Download reports & update books.
Reconciliation in 5 Simple Steps
Prepare Your Files
ReconcileIQ offers multiple ways to get your transaction data. Choose the method that works best for your setup:
Direct API Integration (Recommended)
Connect your accounting software directly:
- QuickBooks Online - Real-time sync
- Xero - Direct connection
- Sage - Seamless integration
- Pandle - Complete API
Benefit: One-click fix push back to your accounting software
File-Based Processing
Export files manually:
- CSV/Excel exports from any system
- PDF converter for 17+ UK banks
- Works with any bank or accounting software
Benefit: Maximum compatibility and control
Method 1: File Export Requirements
If using file-based processing, you'll need two separate files:
- Bank Statement File: Downloaded from your online banking portal (CSV, Excel, or PDF for supported banks).
- Accounting Records File: Exported from your bookkeeping system (e.g., Xero, QuickBooks, Sage).
Supported File Formats:
- CSV/Excel:
CSV,XLSX, orXLSfrom any bank or accounting software - PDF Converter: PDF bank statements from 17+ UK banks (Lloyds, HSBC, NatWest, Mettle, Monzo, etc.) - automatically converted to CSV
File Requirements Checklist:
- Date Range: Both files should cover the exact same time period.
- Headers: The first row should contain clear column headers (e.g., "Date", "Amount", "Description").
- Essential Columns: Each file *must* contain columns representing:
- Transaction Date: When the transaction occurred. (e.g.,
Date,Transaction Date,Posted) - Transaction Amount: Either a single column with positive/negative values OR separate columns for money in/out. (e.g.,
Amount,Credit/Debit,Money In/Money Out) - Transaction Description: Details about the transaction. (e.g.,
Description,Narrative,Reference)
- Transaction Date: When the transaction occurred. (e.g.,
- Optional Fee Column: If your statement has a separate column for fees, ReconcileIQ can handle it (e.g.,
Fee,Charges). Fees will be treated as negative amounts (outflows).
Example Accepted Headers:
| Column Type | Common Header Examples |
|---|---|
| Date | Date, Transaction Date, Posted, Value Date |
| Description | Description, Narrative, Details, Reference, Memo |
| Single Amount | Amount, Value, Total, Gross |
| Money In (Credits) | Credit, Credit Amount, Money In, Deposits |
| Money Out (Debits) | Debit, Debit Amount, Money Out, Withdrawals |
| Fee (Optional) | Fee, Fees, Charges, Commission |
Date Format Tip: ReconcileIQ tries to detect formats like DD/MM/YYYY and MM/DD/YYYY automatically. If your dates are ambiguous (e.g., 01/02/2024), the system might ask you to verify the format during mapping. Consistent date formatting helps!
Lightning Fast Processing: ReconcileIQ processes 5,000+ transactions per second with perfect accuracy. Large files with 100,000+ transactions complete in under 20 seconds.
Need help exporting? Check our PDF converter guide or API integration setup for detailed instructions.
Upload Files to ReconcileIQ
Go to the ReconcileIQ dashboard (bankreconciler.app/tool):
PDF Bank Statements: Upload PDF statements from 17+ UK banks (Lloyds, HSBC, NatWest, Mettle, Monzo, etc.) - they'll be automatically converted to CSV format before processing.
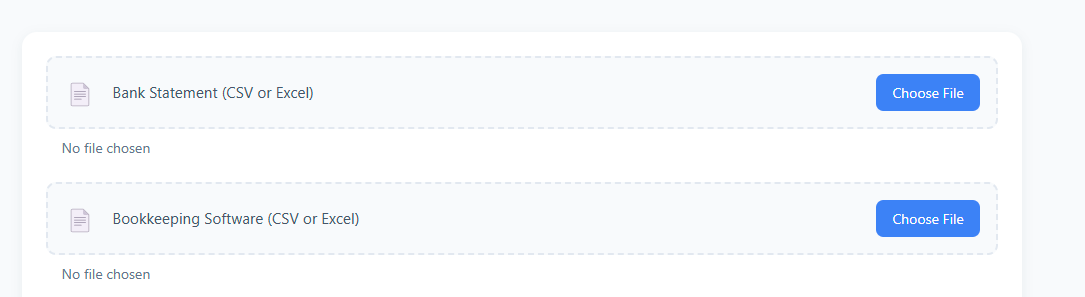
- Locate the "Bank Statement" upload area.
- Click "Choose File" or drag and drop your bank statement file (CSV, Excel, or PDF) onto the designated area.
- If uploading a PDF from a supported UK bank, ReconcileIQ will automatically convert it to CSV format.
- Repeat for the "Bookkeeping Software" upload area using your accounting records file.
- Once both files are selected, click the blue "Reconcile Statements" button to proceed to the mapping step.
Check Carefully: Make sure you upload the bank file to the "Bank Statement" section and the accounting file to the "Bookkeeping Software" section. Mixing these up will cause incorrect results.
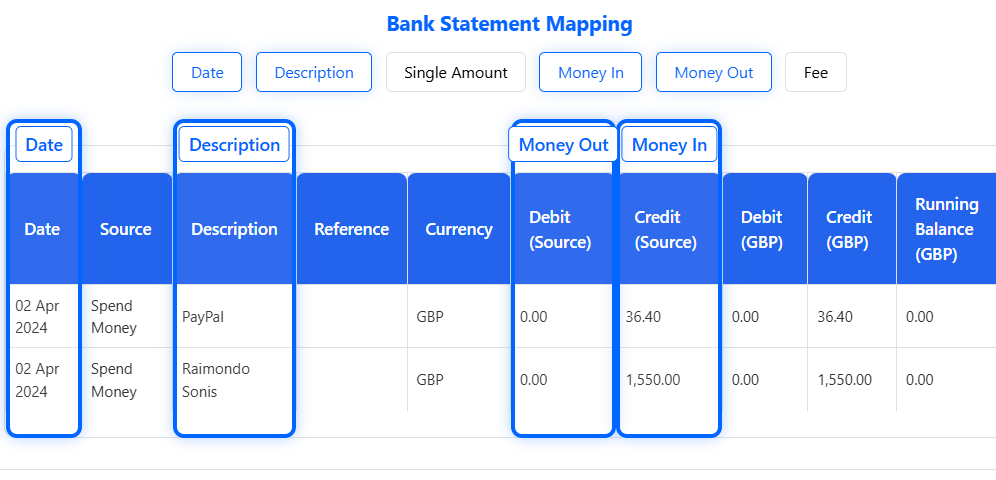
Map Columns & Set Currency
This crucial step tells ReconcileIQ where to find the necessary data in your files.
- Automatic Detection: ReconcileIQ will try to automatically identify the Date, Amount (or Money In/Out pair), and Description columns based on common headers. It will highlight its suggestions.
- Verify Mapping: Carefully check if the highlighted columns (indicated by the blue overlays) correctly correspond to Date, Amount/Pair, and Description in *both* your files (Bank and Books). Review the sample rows shown.
- Adjust if Needed: If the automatic mapping is wrong, click and drag the blue header labels (e.g., "Date") to the correct column header in your file preview.
- If you use separate Debit/Credit columns, use the "Map Money In / Money Out" toggle and map both.
- Map Optional Fee: If you have a separate Fee column, click the "Map Fee" toggle and drag the "Fee" label to that column.
- Set Currency: Use the dropdown menu at the top to select the currency of the files (GBP, EUR, or USD). This ensures amounts are interpreted correctly.
- Confirm: When you are satisfied that all required columns are correctly mapped for both files, click the "These columns are correct" button.
Amount Mapping: ReconcileIQ handles both single 'Amount' columns (where outflows are negative) and separate 'Money In' / 'Money Out' (or 'Credit' / 'Debit') columns. Ensure you map whichever format your files use.
Ambiguous Dates? If your date format could be DD/MM or MM/DD (e.g., 01/02/2024), ReconcileIQ might show a warning here. Double-check your date column selection. See our FAQ for date format details.
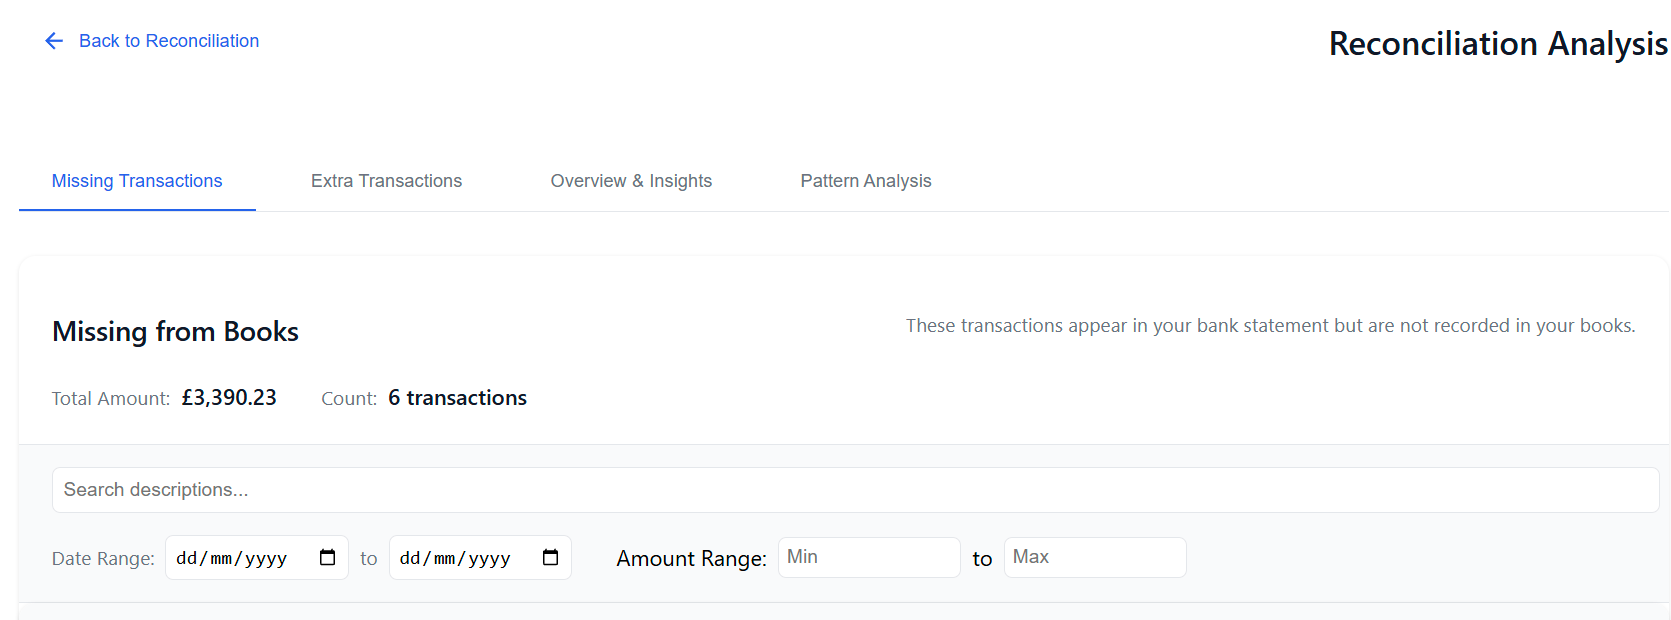
Reconcile & Review Results
Once columns are confirmed, ReconcileIQ processes your files and displays the results. Focus on the key discrepancy tabs:
-
Missing from Books Tab:Shows transactions found in your Bank Statement but *not* matched in your Accounting Records. These typically need to be added to your books.
-
Extra in Books Tab:Shows transactions found in your Accounting Records but *not* matched in your Bank Statement. Investigate these - common causes are timing differences (e.g., checks not cleared), duplicate entries, or errors.
-
Overview & Insights Tab:Provides a summary, charts comparing totals, and potential insights or patterns observed (depending on your plan).
Use the tabs at the top of the results page to switch between these views.
Matching Logic: ReconcileIQ matches transactions primarily based on Amount and looks for corresponding entries within a few days (Date Proximity). Advanced plans also use fuzzy description matching.
Export & Take Action
ReconcileIQ identifies discrepancies; the final step is acting on them:
- Export Reports: At the bottom of the 'Missing' and 'Extra' tabs, use the "Export PDF" or "Export CSV" buttons.
- CSV is useful for importing missing transactions into accounting software.
- PDF provides a formatted report for records or sharing.
- Action Missing Items: Use the exported 'Missing from Books' list to add these transactions accurately into your accounting system.
- Investigate Extra Items: Review the 'Extra in Books' list.
- Are they timing differences? (e.g., check issued but not cashed) - Usually no action needed immediately.
- Are they duplicates or errors? - Correct or delete them in your accounting system.
- Verify (Optional): After making corrections in your books, you can export a fresh accounting file and re-run the reconciliation in ReconcileIQ to confirm everything now matches perfectly.
Data Persistence: ReconcileIQ processes your files temporarily for security. Results are only available during your current session. Always export any reports you need before closing your browser window.
Ready for More Details?
This guide covered the basics. Dive deeper into specific features like fuzzy matching, pattern analysis, LedgerIQ, and troubleshooting with our full user guides.